Export
Click the button below, Export With Correction, to choose the photo export settings.
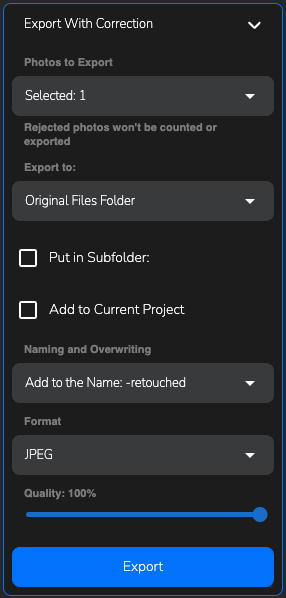
Export with correction menu
Photos to export
Here you can choose which category of photos you want to process: Selected, Favorite, or Rejected.
Export to
Choose the save path for the processed photos. You can either save them in the original folder or specify a custom path.
- If you want the processed photos to be in a separate folder, select the
Put in Subfolderoption. - If you want to add the processed photos to the current project, check the
Add to current projectcheckbox.
Naming and Overwriting
Here, you can choose the option to save the photos in the original folder by adding a suffix to the name of the processed photo, or overwrite the originals.
Format
Choose the desired format for exporting photos. Several options are available for saving images:
Keep– Keep the original photo format without changesJPEG– A format for smaller photos with a low final file sizePNG– A format for medium-sized photos with a moderate final file size, without quality lossTIFF– A format for high-resolution photos, which can later be used for printing, with a larger final size and no quality lossTIFF (layers)– A format for future use in graphic editors, where the layers of the plugin adjustments will be saved for further processing or editing of the parameters
Quality
Here, you can choose the level of compression for the photo in the final image format using the slider.
Export project
Adjust the export settings and click Export to save the photos in the folder you specified.